Free Shipping on orders over R3,999. T's&C's Apply.

How To Clean Grout Lines with a Steam Cleaner
Grout lines can be one of the trickiest areas to clean in your bathroom or kitchen. Over time, dirt, grime, and mold can accumulate in the porous material, making grout look discolored and grimy. While traditional scrubbing and harsh chemicals might help, a Tecnovap Steam Cleaner offers a more effective, eco-friendly way to restore your grout to its original shine. In this guide, we’ll show you how to use a steam cleaner to tackle dirty grout lines with ease.
Why Use a Steam Cleaner for Grout?
Steam cleaners are an excellent choice for cleaning grout because they use high-temperature steam of 155°C and upwards to break down dirt and grime. The steam penetrates deep into the grout, loosening dirt and killing bacteria, mold, and mildew without the need for harsh chemicals. This method is not only safe for the environment but also incredibly effective.
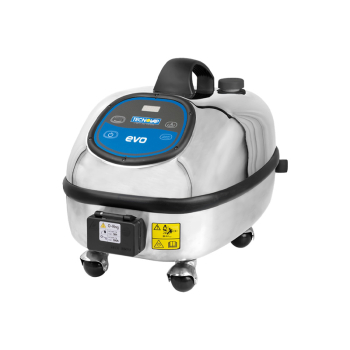
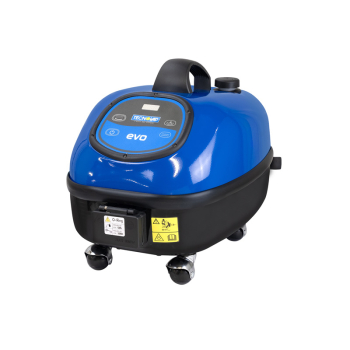
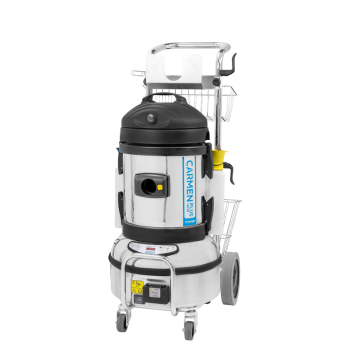
What Steam Cleaner to Use for Grout Cleaning:
Step-by-Step Guide to Cleaning Grout Lines:
Step 1: Prepare Your Steam Cleaner
Start by filling the steam cleaner with water, following the Tecnovap Operating Manual. Attach the pressure lance nozzle and the nylon brush to the steam cleaner. This attachment is designed to focus the steam directly onto grout lines for deep cleaning.
Step 2: Clear the Area
Before you begin cleaning, make sure the surface is free of any loose debris. Sweep or vacuum the area to remove dust, dirt, and hair that could interfere with the steam cleaner’s performance.
Step 3: Pre-Heat the Steam Cleaner
Turn on the steam cleaner and let it heat up to temperature. The Tecnovap Steam Cleaner has an indicator light to tell you when the steam is ready. This usually takes a few minutes.
Step 4: Begin Cleaning
Start at one corner of the tiled area and slowly move the steam cleaner along the grout lines. Hold the nozzle attached with the nylon brush on the grout lines, slowly running over the grout lines with light contact. Move the steam cleaner back and forth, applying gentle pressure as needed. The steam will loosen grime, which you can then wipe away with a microfiber cloth.
For stubborn stains or heavily soiled grout, pause and focus the steam on the affected area for a longer period.
Step 5: Wipe Away Dirt
As you clean, the loosened dirt and grime will collect on the surface. Use a microfiber cloth to wipe the surface clean as you go. This prevents the dirt from settling back into the grout lines.
Step 6: Final Touches
Once you've cleaned all the grout lines, allow the area to dry. If needed, give the grout a final wipe-down to remove any remaining residue. You’ll notice that the grout lines look noticeably brighter and cleaner.
Tips For Best Results
- Seal Your Grout After Cleaning: Grout is porous, which means it can easily absorb dirt and moisture. After cleaning, consider applying a grout sealer to protect it from future stains and mold growth.
- Spot Test Before Cleaning: If you’re using a steam cleaner on grout for the first time, it’s a good idea to test it on a small, inconspicuous area. This ensures that the steam won’t damage the grout or surrounding tiles.
- Routine Maintenance: Regular steam cleaning can help keep grout lines looking fresh and prevent the buildup of dirt and grime over time.
- Regularly cleaning the floor with steam instead of wet mopping will help keep grout lines cleaner for longer, as minimal water deposits are left behind.
Advantages of Using a Steam Cleaner
- Eco-Friendly: No harsh chemicals are needed, making this method safer for the environment and your household.
- Effective Cleaning: Steam cleaners can reach deep into the pores of grout, effectively lifting stubborn dirt, bacteria, and mold that traditional scrubbing might miss.
- Time-Saving: Cleaning grout manually can be time-consuming and exhausting. A steam cleaner significantly reduces the effort and time needed to achieve sparkling results.